N9+ Device and Features

What is the N9+ Diagnostic Device?

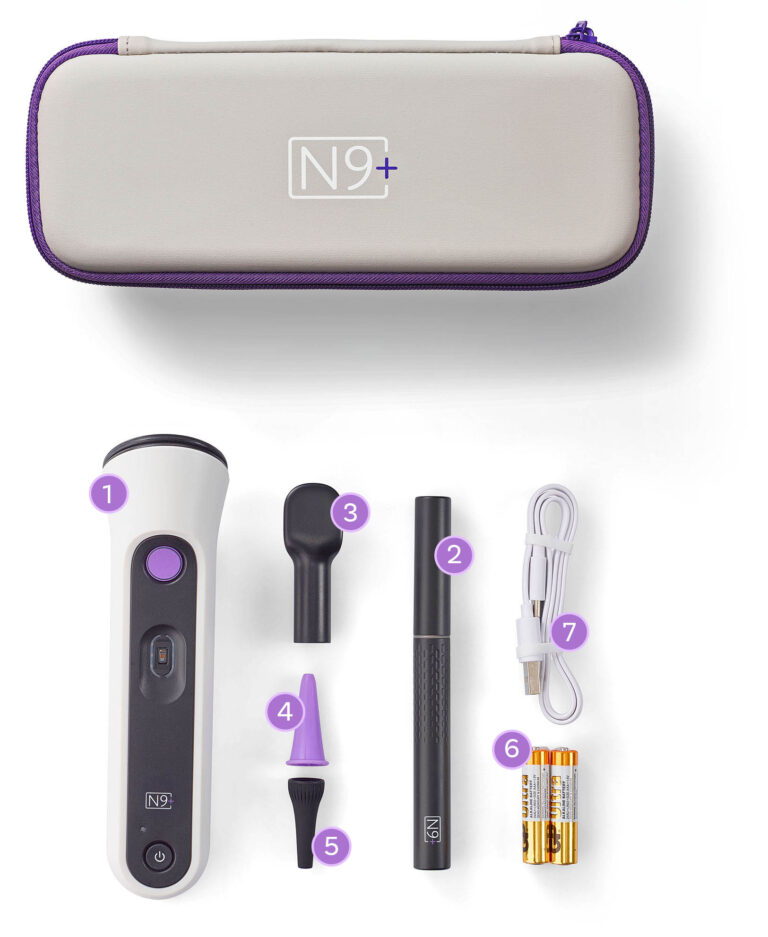
Your kit includes the N9+, a smart 9-in-1 device designed to help you check your child’s health from home and share results directly with your KixCare pediatric experts.

It comes with a handheld device, a small camera for ear and throat checks, and an app that guides you step by step, so you always know what to do, even if it’s your first time using it.

It uses built-in sensors to capture accurate health information that your KixCare pediatric experts can review, helping them better understand what’s going on and guide your child’s care with confidence.

Included in the Box

  1. N9+ Multi-Sensor Device
  2. N9+ Otoscope
  3. Tongue depressor
  4. 3 X Adult Ear Specula (age 2+)
  5. 3 X Toddlers Ear Specula
  6. 2 X 1.5V AAA batteries
  7. USB-C charge Cable

What You Can Check with the N9+ Device

Stethoscope: Listen to your child’s heart, lungs, and tummy sounds.
Thermometer: Quickly check your child’s temperature with a gentle forehead scan.
Pulse Oximeter: Measure your child’s oxygen levels and pulse.
Otoscope: Safely look inside your child’s ear and throat to help check for signs of infection.
Mouth Check: Capture clear visuals of your child’s mouth.
Skin Images: Take clear photos of your child’s skin, such as rashes or irritation.

Ready to Monitor Your Child's Health With the N9+ Diagnostic Device?
Complete the form below and a member of our team will be in touch shortly.

Getting Started

Below are simple step-by-step instructions to help you activate your N9+ account and begin using your device:

Step 1: Download the N9+ App

Step 2: Create Your Account

  • Tap “Register” on the login screen.
  • Enter your email address.
  • Create and confirm your password.
  • Accept the License Agreement and Privacy Policy.
  • Tap “Submit”.
  • Check your email for your verification code.

Step 3: Verify Your Email

  • Enter the 6-digit verification code.
  • Tap “Submit”.
  • Follow the prompts to complete your account details.

Step 4: Create Profile(s) for Your Child(ren)

  • Create a profile for your child using the +Add Member option on the Dashboard.
  • Once complete, you can add additional children as needed.
  • Tap “Finish” to access your Member Dashboard.

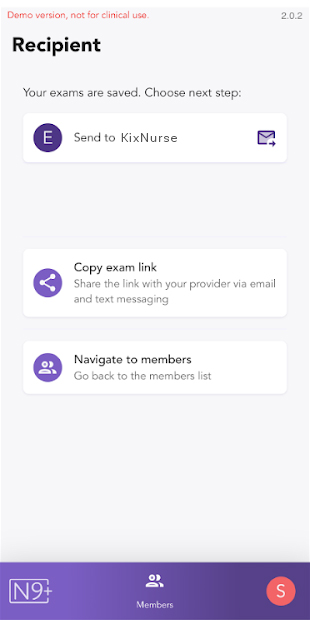
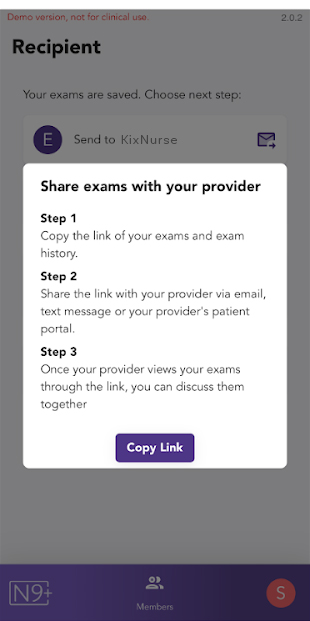
From your dashboard, you can:

  • Add or edit member profiles.
  • Update your information.
  • Start using your N9+ kit for exams.

 Step 5: Connect Your Device

  • Ensure your device is connected to Wi-Fi.
  • Follow the in-app instructions to pair your N9+ device.

Completing an Exam and Seeking Care

  • Families with the N9+ device should reach out on the messaging chat to initiate care from the KixNurse.
  • The KixNurse will assess and support the family to complete the required device assessments based on your child’s health and wellness concerns. 
  • Once the N9+ exam is completed you will copy the link and paste the link into the messaging chat so the KixNurse to review.
How families share the link:

Prepare and Cleaning the N9+

Charging Devices

  1. Charge the N9+ wireless otoscope using the USB-C charging cable (included in the kit) and a standard USB-C charger. Once fully charged, the otoscope red light will turn off.
  2. Insert the Insert the 2 AAA batteries into the back of the N9+ Multi-Sensor Device following the +/- markings. Press the ON/OFF button once and make sure the indication light is blue.

Care and Maintenance

Proper care, cleaning, and handling are essential for the operation of the Nonagon Care Kit. Follow the instructions below for cleaning and disinfection of the kit.

Cleaning

  • Thoroughly remove any visible dirt from the N9+ device with a soft dry cloth or tissue, using a gentle wiping or blotting motion. Pay close attention to the Pulse Oximeter window and avoid aggressive wiping or scrubbing in these areas as this may damage the lens surfaces.
  • Never use thinners, benzene, gasoline or other strong solvents to clean the parts.

Ear specula and tongue depressor:

  1. Fully submerge the part in soapy water for at least 30 seconds.
  2. Wipe the parts with a soft cloth dampened with soapy water.
  3. Wipe the inner side of the parts with a folded soft cloth or a cotton swab dampened with soapy water.
  4. Thoroughly rinse the parts with running water.
  5. Air dry or use a soft, fiber-free dry cloth to dry the part.

Note: During the ear inspection, ear scraps may block the surface of the wireless otoscope camera lens and affect the viewing. Blow or use a soft dry cloth or a cotton swab to remove them.

Inspect the kit to verify that the product is intact. Discontinue use if there are any signs of damage such as cracking or any other damage that may jeopardize the integrity of the devices. Report any damage to the kit and discontinue use of the devices. If any dirt remains, repeat the cleaning steps, as necessary. Once thoroughly clean, the system must be disinfected. Follow the disinfection instructions below.

Disinfection

The Nonagon Care Kit is classified as noncritical for disinfection as it only comes into contact with intact skin or the mouth. Therefore, only low-level disinfection is required according to the instructions below. The Nonagon Care Kit and accessories should be cleaned and disinfected before the first use, and immediately following the end of each use.

N9+ Multi-Sensor Device:

  • Use a soft cloth, moistened with 70% medical grade alcohol. Ensure the alcohol is in contact with all surfaces of the device for at least a minute and a half. Do not use a spray or immersion method for disinfection as this may result in liquids entering and damaging the device.
  • Air dry or use a soft, fiber-free dry cloth to thoroughly dry the device.

Ear Specula and Tongue Depressor:

  1. Fully submerge the ear specula and tongue depressor in 70% medical grade alcohol for at least 30 seconds.
  2. Leave the parts to air dry before use. Do not use until fully dried.

Once thoroughly cleaned and dried, store the Nonagon Care Kit in its carrying case and locate it with its accessories in a safe cool and dry place, away from direct sunlight.

Warnings

  • The Nonagon Care Kit must be cleaned after each use. Thorough cleaning is an essential step for effective disinfection.
  • Use only the cleaning and disinfection solutions stated in the instructions. Use of any other solutions may result in damage to the system.
  • Never submerge the N9+ device and wireless otoscope in liquids. Do not allow any liquid to enter the devices.

Cautions

  • When handling the kit, be careful not to bump the device on any hard surfaces.
  • When not in use, always store the kit with its accessories in a safe cool and dry place, away from direct sunlight.
  • The kit is not intended to be sterilizedS

FAQ

If asked to insert your Client-ID, you should contact support@kixcare.com or speak with the KixNurse in the messaging tab. The ID links you our KixCare team.

During the Ears or Throat exams, iPhones present an alert regarding your Wi-Fi connection. When displayed, remember to select “Keep trying Wi-Fi” in order to continue with the exam. You will be reminded of this at the start of the exams.

  • Make sure your child’s forehead is clean, dry and cleared of hair.
  • Make sure the thermometer sensor and the diaphragm are touching their forehead.
  • Try to have your child remain calm and still and take deep breaths.
  • Make sure your child’s hands are warm.
  • Don’t press on the sensor, but rather rest your child’s finger on it.
  • Always perform the exam on bare skin.
  • Make sure the exam environment is as quiet as possible (turn off the TV and other noisy appliances, and move away from other people who may be speaking).
  • Hold the stethoscope firmly and close to the sensor membrane.
  • Avoid any motion during the recording. Don’t press too hard since this may muffle the sounds.
  • If the noise level was too high during a recording, a popup will allow you to go back and record that point again.
  • To listen to any of the stethoscope exams, you must have earphones or ear buds. Make sure they are properly connected to your phone and the volume is up.
  • Make sure the speculum is clean of any fibers that may interfere with the video.
  • Make sure you’ve secured the ear speculum tightly all the way down on the otoscope so no gap is left between the speculum and the otoscope light indicator ring.
  • In some cases, you may be able to simply insert the otoscope with the speculum straight in without pulling and maneuvering the ear.
  • To easily expose the back of the throat, try having your child reach their chin with their tongue.
  • When performing the exam on small children who will find it hard to hold the position for more than a few seconds, it is fine to get just 2-3 seconds of the throat and tonsils.
  • Make sure the camera is in focus.
  • Zoom out to also photograph the general area around the point of focus.
  • If the exact area in question isn’t specified in the figure, add more identifying details in the text/video description before you send the exam to the KixCare Nurse in the message icon.
  • It’s simple. The multisensor device pairs with your smartphone via Bluetooth, and the otoscope connects via its wireless network.
  • Sending exams to your KixCare Nurse can be done via wireless or cellular networks.

Message the KixNurse or email support@kixcare.com and we will be happy to assist you.